Bridge 桥接模式
Intent 意图
Bridge is a structural design pattern that lets you split a large class or a set of closely related classes into two separate hierarchies—abstraction and implementation—which can be developed independently of each other.
Bridge是一种结构设计模式,它允许您将一个大型类或一组密切相关的类拆分为两个单独的层次结构(抽象和实现),这两个层次结构可以相互独立开发。

Problem 问题
Abstraction? Implementation? Sound scary? Stay calm and let’s consider a simple example.
抽象化?实现?听起来很吓人?保持冷静,让我们考虑一个简单的例子。
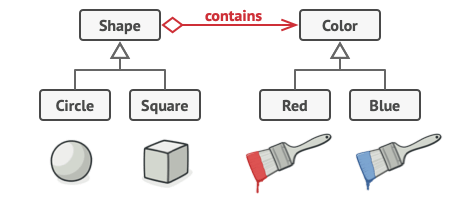
Say you have a geometric Shape class with a pair of subclasses: Circle and Square. You want to extend this class hierarchy to incorporate colors, so you plan to create Red and Blue shape subclasses. However, since you already have two subclasses, you’ll need to create four class combinations such as BlueCircle and RedSquare.
假设您有一个几何类,其中包含一对子 Shape 类: Circle 和 Square 。您希望扩展此类层次结构以合并颜色,因此您计划创建 Red 和 Blue 调整子类。但是,由于您已经有两个子类,因此需要创建四个类组合,例如 BlueCircle 和 RedSquare 。
 Number of class combinations grows in geometric progression.类组合的数量以几何级数增长。
Solution 解决方案
This problem occurs because we’re trying to extend the shape classes in two independent dimensions: by form and by color. That’s a very common issue with class inheritance.
出现此问题的原因是,我们尝试在两个独立的维度中扩展形状类:按形状和按颜色。这是类继承的一个非常常见的问题。
The Bridge pattern attempts to solve this problem by switching from inheritance to the object composition. What this means is that you extract one of the dimensions into a separate class hierarchy, so that the original classes will reference an object of the new hierarchy, instead of having all of its state and behaviors within one class.
Bridge 模式试图通过从继承切换到对象组合来解决此问题。这意味着将其中一个维度提取到单独的类层次结构中,以便原始类将引用新层次结构的对象,而不是将其所有状态和行为都放在一个类中。
 You can prevent the explosion of a class hierarchy by transforming it into several related hierarchies.可以通过将类层次结构转换为多个相关的层次结构来防止类层次结构的爆炸式增长。
Abstraction and Implementation 抽象和实现
The GoF book introduces the terms Abstraction and Implementation as part of the Bridge definition. In my opinion, the terms sound too academic and make the pattern seem more complicated than it really is. Having read the simple example with shapes and colors, let’s decipher the meaning behind the GoF book’s scary words.
GoF一书引入了术语“抽象”和“实现”,作为桥接定义的一部分。在我看来,这些术语听起来太学术化了,使模式看起来比实际情况更复杂。在阅读了带有形状和颜色的简单示例之后,让我们破译 GoF 书的可怕单词背后的含义。
Abstraction (also called interface) is a high-level control layer for some entity. This layer isn’t supposed to do any real work on its own. It should delegate the work to the implementation layer (also called platform).
抽象(也称为接口)是某些实体的高级控制层。这个层不应该自己做任何真正的工作。它应该将工作委托给实现层(也称为平台)。
Note that we’re not talking about interfaces or abstract classes from your programming language. These aren’t the same things.
请注意,我们不是在谈论编程语言中的接口或抽象类。这些不是一回事。
When talking about real applications, the abstraction can be represented by a graphical user interface (GUI), and the implementation could be the underlying operating system code (API) which the GUI layer calls in response to user interactions.
在谈论实际应用程序时,抽象可以由图形用户界面 (GUI) 表示,实现可以是 GUI 层为响应用户交互而调用的底层操作系统代码 (API)。
Generally speaking, you can extend such an app in two independent directions:
一般来说,您可以在两个独立的方向上扩展此类应用程序:
- Have several different GUIs (for instance, tailored for regular customers or admins).
有几个不同的 GUI(例如,为普通客户或管理员量身定制)。 - Support several different APIs (for example, to be able to launch the app under Harmony, Windows, Linux, and macOS).
支持多个不同的 API(例如,能够在 Harmony, Windows、Linux 和 macOS 下启动应用程序)。
In a worst-case scenario, this app might look like a giant spaghetti bowl, where hundreds of conditionals connect different types of GUI with various APIs all over the code.
在最坏的情况下,这个应用程序可能看起来像一个巨大的意大利面碗,其中数百个条件将不同类型的 GUI 与代码中的各种 API 连接起来。
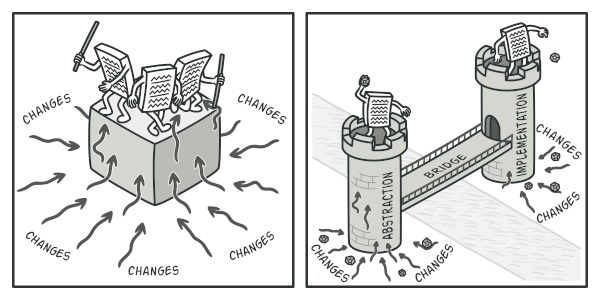 Making even a simple change to a monolithic codebase is pretty hard because you must understand the entire thing very well. Making changes to smaller, well-defined modules is much easier.即使是对单体代码库进行简单的更改也非常困难,因为您必须很好地理解整个事情。对更小、定义明确的模块进行更改要容易得多。
Let’s try to solve this issue with the Bridge pattern. It suggests that we divide the classes into two hierarchies:
让我们尝试使用 Bridge 模式来解决这个问题。它建议我们将类分为两个层次结构:
- Abstraction: the GUI layer of the app.
抽象:应用的 GUI 层。 - Implementation: the operating systems’ APIs.
实现:操作系统的 API。The abstraction object controls the appearance of the app, delegating the actual work to the linked implementation object. Different implementations are interchangeable as long as they follow a common interface, enabling the same GUI to work under Harmony, Windows and Linux. 抽象对象控制应用的外观,将实际工作委托给链接的实现对象。不同的实现是可以互换的,只要它们遵循一个通用的接口,使相同的 GUI 能够在Harmony, Windows 和 Linux 下工作。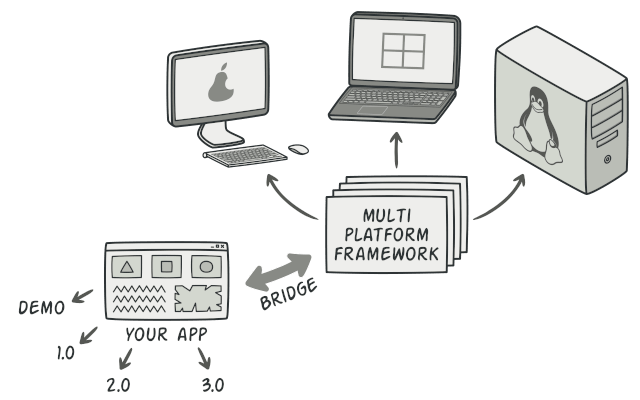 One of the ways to structure a cross-platform application.构建跨平台应用程序的方法之一。
As a result, you can change the GUI classes without touching the API-related classes. Moreover, adding support for another operating system only requires creating a subclass in the implementation hierarchy.
因此,您可以在不接触 API 相关类的情况下更改 GUI 类。此外,添加对另一个操作系统的支持只需要在实现层次结构中创建一个子类。
Structure 结构
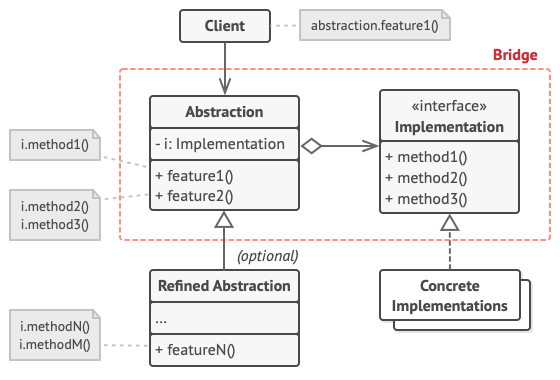
The Abstraction provides high-level control logic. It relies on the implementation object to do the actual low-level work.
抽象提供高级控制逻辑。它依赖于实现对象来执行实际的低级工作。The Implementation declares the interface that’s common for all concrete implementations. An abstraction can only communicate with an implementation object via methods that are declared here.
实现声明了所有具体实现通用的接口。抽象只能通过此处声明的方法与实现对象进行通信。Concrete Implementations contain platform-specific code.
具体实现包含特定于平台的代码。Refined Abstractions provide variants of control logic. Like their parent, they work with different implementations via the general implementation interface.
精炼的抽象提供了控制逻辑的变体。与它们的父级一样,它们通过通用实现接口使用不同的实现。Usually, the Client is only interested in working with the abstraction. However, it’s the client’s job to link the abstraction object with one of the implementation objects.
通常,客户端只对处理抽象感兴趣。但是,客户端的工作是将抽象对象与其中一个实现对象链接起来。
Pseudocode 伪代码
This example illustrates how the Bridge pattern can help divide the monolithic code of an app that manages devices and their remote controls. The Device classes act as the implementation, whereas the Remotes act as the abstraction.
此示例演示了 Bridge 模式如何帮助划分管理设备及其遥控器的应用的整体代码。 Device 类充当实现,而 Remotes 充当抽象。
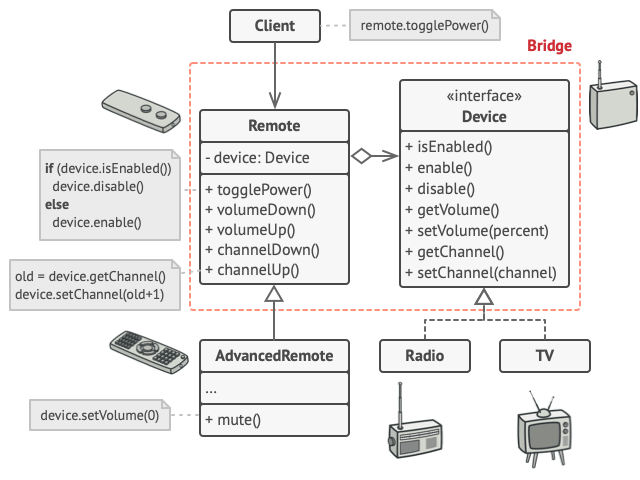 The original class hierarchy is divided into two parts: devices and remote controls.原始的类层次结构分为两部分:设备和遥控器。
You can develop the remote control classes independently from the device classes. All that’s needed is to create a new remote subclass. For example, a basic remote control might only have two buttons, but you could extend it with additional features, such as an extra battery or a touchscreen.
您可以独立于设备类开发远程控制类。所需要的只是创建一个新的远程子类。例如,一个基本的遥控器可能只有两个按钮,但您可以使用其他功能(例如额外的电池或触摸屏)对其进行扩展。
The client code links the desired type of remote control with a specific device object via the remote’s constructor.
客户端代码通过遥控器的构造函数将所需类型的遥控器与特定设备对象链接起来。
1 | // The "abstraction" defines the interface for the "control" |
Applicability 适用性
Use the Bridge pattern when you want to divide and organize a monolithic class that has several variants of some functionality (for example, if the class can work with various database servers).如果要划分和组织具有某些功能的多个变体的整体类(例如,如果该类可以与各种数据库服务器一起使用),请使用 Bridge 模式。
The bigger a class becomes, the harder it is to figure out how it works, and the longer it takes to make a change. The changes made to one of the variations of functionality may require making changes across the whole class, which often results in making errors or not addressing some critical side effects.
一个班级变得越大,就越难弄清楚它是如何工作的,做出改变所需的时间就越长。对功能变体之一所做的更改可能需要在整个类中进行更改,这通常会导致出错或无法解决一些关键的副作用。
The Bridge pattern lets you split the monolithic class into several class hierarchies. After this, you can change the classes in each hierarchy independently of the classes in the others. This approach simplifies code maintenance and minimizes the risk of breaking existing code.
Bridge 模式允许您将整体类拆分为多个类层次结构。在此之后,您可以独立于其他层次结构中的类更改每个层次结构中的类。此方法简化了代码维护,并最大限度地降低了破坏现有代码的风险。
Use the pattern when you need to extend a class in several orthogonal (independent) dimensions. 当您需要在多个正交(独立)维度中扩展类时,请使用该模式。
The Bridge suggests that you extract a separate class hierarchy for each of the dimensions. The original class delegates the related work to the objects belonging to those hierarchies instead of doing everything on its own.
Bridge 建议您为每个维度提取单独的类层次结构。原始类将相关工作委托给属于这些层次结构的对象,而不是自己执行所有操作。
Use the Bridge if you need to be able to switch implementations at runtime.
如果您需要能够在运行时切换实现,请使用 Bridge。
Although it’s optional, the Bridge pattern lets you replace the implementation object inside the abstraction. It’s as easy as assigning a new value to a field.
尽管它是可选的,但 Bridge 模式允许您替换抽象中的实现对象。这就像为字段分配新值一样简单。
By the way, this last item is the main reason why so many people confuse the Bridge with the Strategy pattern. Remember that a pattern is more than just a certain way to structure your classes. It may also communicate intent and a problem being addressed.
顺便说一句,最后一项是这么多人将桥接模式与策略模式混淆的主要原因。请记住,模式不仅仅是构建类的某种方式。它还可以传达意图和正在解决的问题。
How to Implement 如何实现
Identify the orthogonal dimensions in your classes. These independent concepts could be: abstraction/platform, domain/infrastructure, front-end/back-end, or interface/implementation.
确定类中的正交维度。这些独立的概念可以是:抽象/平台、域/基础结构、前端/后端或接口/实现。See what operations the client needs and define them in the base abstraction class.
查看客户端需要哪些操作,并在基抽象类中定义它们。Determine the operations available on all platforms. Declare the ones that the abstraction needs in the general implementation interface.
确定所有平台上可用的操作。在通用实现接口中声明抽象需要的那些。For all platforms in your domain create concrete implementation classes, but make sure they all follow the implementation interface.
对于域中的所有平台,请创建具体的实现类,但请确保它们都遵循实现接口。Inside the abstraction class, add a reference field for the implementation type. The abstraction delegates most of the work to the implementation object that’s referenced in that field.
在抽象类中,为实现类型添加一个引用字段。抽象将大部分工作委托给该字段中引用的实现对象。If you have several variants of high-level logic, create refined abstractions for each variant by extending the base abstraction class.
如果有多个高级逻辑变体,请通过扩展基本抽象类为每个变体创建精细的抽象。The client code should pass an implementation object to the abstraction’s constructor to associate one with the other. After that, the client can forget about the implementation and work only with the abstraction object.
客户端代码应将实现对象传递给抽象的构造函数,以将一个对象与另一个对象相关联。之后,客户端可以忘记实现,只使用抽象对象。
Pros and Cons 优点和缺点
| Pros 优点 | Cons 缺点 |
|---|---|
| You can create platform-independent classes and apps.您可以创建与平台无关的类和应用。 | You might make the code more complicated by applying the pattern to a highly cohesive class. 通过将模式应用于高度内聚的类,可以使代码更加复杂。 |
| The client code works with high-level abstractions. It isn’t exposed to the platform details. 客户端代码使用高级抽象。它不会公开给平台详细信息。 | |
| Open/Closed Principle. You can introduce new abstractions and implementations independently from each other. 开/闭原理。您可以引入新的抽象和实现,彼此独立。 | |
| Single Responsibility Principle. You can focus on high-level logic in the abstraction and on platform details in the implementation. 单一责任原则。您可以专注于抽象中的高级逻辑和实现中的平台细节。 |
Relations with Other Patterns 与其他模式的关系
Bridge is usually designed up-front, letting you develop parts of an application independently of each other. On the other hand, Adapter is commonly used with an existing app to make some otherwise-incompatible classes work together nicely.
Bridge 通常是预先设计的,允许您彼此独立地开发应用程序的各个部分。另一方面,Adapter 通常与现有应用程序一起使用,以使一些不兼容的类很好地协同工作。Bridge, State, Strategy (and to some degree Adapter) have very similar structures. Indeed, all of these patterns are based on composition, which is delegating work to other objects. However, they all solve different problems. A pattern isn’t just a recipe for structuring your code in a specific way. It can also communicate to other developers the problem the pattern solves.
桥接、状态、策略(在某种程度上还有适配器)具有非常相似的结构。事实上,所有这些模式都是基于构图的,而构图是将工作委托给其他对象。但是,它们都解决了不同的问题。模式不仅仅是以特定方式构建代码的秘诀。它还可以向其他开发人员传达该模式解决的问题。You can use Abstract Factory along with Bridge. This pairing is useful when some abstractions defined by Bridge can only work with specific implementations. In this case, Abstract Factory can encapsulate these relations and hide the complexity from the client code.
You can combine Builder with Bridge: the director class plays the role of the abstraction, while different builders act as implementations.
您可以将 Builder 与 Bridge 结合使用:director 类扮演抽象的角色,而不同的构建器充当实现。
Code Examples 代码示例
Python Conceptual Example 概念示例
This example illustrates the structure of the Bridge design pattern. It focuses on answering these questions:
此示例说明了 Bridge 设计模式的结构。它侧重于回答以下问题:
- What classes does it consist of?
它由哪些类组成? - What roles do these classes play?
这些课程扮演什么角色? - In what way the elements of the pattern are related?
模式的元素以何种方式相关?
main.py
1 | from __future__ import annotations |
Output.txt: Execution result
1 | Abstraction: Base operation with: |
Rust Conceptual Example 概念示例
Devices and Remotes 设备和遥控器
This example illustrates how the Bridge pattern can help divide the monolithic code of an app that manages devices and their remote controls. The Device classes act as the implementation, whereas the Remotes act as the abstraction.
此示例演示了 Bridge 模式如何帮助划分管理设备及其遥控器的应用的整体代码。Device 类充当实现,而 Remote 充当抽象。
remotes/mod.rs
1 | mod advanced; |
remotes/basic.rs
1 | use crate::device::Device; |
remotes/advanced.rs
1 | use crate::device::Device; |
device/mod.rs
1 | mod radio; |
device/radio.rs
1 | use super::Device; |
device/tv.rs
1 | use super::Device; |
main.rs
1 | mod device; |
Output 输出
1 | Tests with basic remote. |